


Debugging Magento 2 Varnish

Magento 2 comes with two options for full page cache (FPC),
- Built In
- Varnish
Built in
This will use whatever has been defined inenv.php as the cache store; or default to using files on disk if nothing is defined.
Eg. If using Redis - it will use Redis as the backing cache store
There's a limited use case for using the built-in cache option; I'd go so far as to say it should never be used. Because you should only use it when Redis is enabled as the cache store; else the performance will be extremely poor (and get progressively slower over time). And ultimately, if you are with a hosting provider that offers Redis, its almost certainly the case that you'll have access to Varnish - which is far more appropriate for the FPC store.
Varnish
When enabled, Magento will add tags to the response headers of the page containing respective static block IDs, CMS page IDs, product IDs, category IDs etc. - allowing Varnish to track exactly what content appears on exactly what page.This highly efficient method of tagging content allows Magento to conditionally purge pages from Varnish the moment any content is changed in the admin.
On a production Magento store; only the Varnish option should be selected - and enabling Varnish on Magento 2 is extremely easy.
Diagnosing Cache Hits
Whilst Magento 2 natively supports Varnish; that's not true of many Magento 2 modules and themes, which have not been designed properly and prevent caching working entirely.This can mean that after enabling Varnish in the Magento admin - you've actually completely turned off caching without realising, resulting in dramatically worse performance, reliability and scalability.
Thankfully, there's a quick way to determine whether you are seeing cache hits in Varnish or not.
Checking by command line
The simplest method is to measure the response time of a page, a Varnish hit is approximately 80ms (0.080s). Using a simplecurl command, you can measure this. Make sure you have a 200 response, else you'll only be measuring a redirect/forbidden etc. message,
time curl -I https://www.example.comHTTP/1.1 200 OK
Content-Type: text/html; charset=UTF-8
Set-Cookie: frontend=o85bt3s41u82aodn7nce58k0ra; expires=Thu, 14-Nov-2019 16:03:43 GMT; Max-Age=86400; path=/; domain=www.example.com; HttpOnly
Expires: Thu, 19 Nov 1981 08:52:00 GMT
Cache-Control: no-store, no-cache, must-revalidate
Pragma: no-cache
Set-Cookie: frontend_cid=Oz4C2qzgRUoroW4F; expires=Thu, 14-Nov-2019 16:03:43 GMT; Max-Age=86400; path=/; domain=www.example.com; secure; HttpOnly
Set-Cookie: nocache=1; expires=Thu, 14-Nov-2019 16:03:43 GMT; Max-Age=86400; path=/; domain=www.example.com; HttpOnly
X-Frame-Options: SAMEORIGIN
Access-Control-Allow-Origin: https://cdn.example.com
X-Frame-Options: SAMEORIGIN
Accept-Ranges: bytes
Date: Wed, 13 Nov 2019 16:03:43 GMT
Vary: Accept-Encoding, User-Agent
Server: MageStack-MagentoOS
Strict-Transport-Security: max-age=0
real 0m0.080s
user 0m0.008s
sys 0m0.000s
The alternative and more accurate method is to enable debug headers and look out for the MageStack-Cache headers.
curl -s -I https://www.example.com | grep -i 'MageStack-Cache'MageStack-Cacheable: Yes
MageStack-Cache-Status: 200
MageStack-Cache-Lifetime: 86400.000
MageStack-Cache-Warning: Refusing to overwrite response TTL for Magento 2
MageStack-Cache-Hits: 4
MageStack-Cache: HitMageStack-Cache-Hits increments on each subsequent hit and that MageStack-Cache says "Hit".
Checking using a resource graph
Whilst far less accurate than command line for a point-in-time measurement, graphs do serve a purpose in measuring the overall effectiveness of Varnish.There is no definitive rule as to what a "good" hit rate is, because it really depends on the traffic on the store, the volume of pages, the content update rate etc. The goal however is to ensure the hit rate is as high as it can be - without being skewed by static content falsely improving the metrics.
If I were undertaking a process to improve hit rate, my goal would be 94%, allowing for 3% conversion and 50% checkout funnel loss.
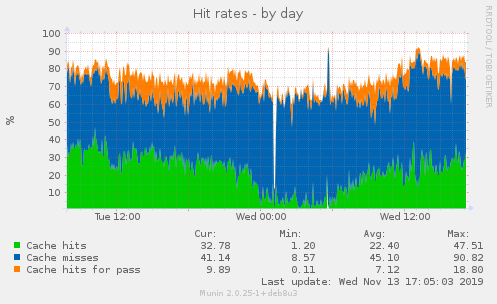
An example above shows the hit rate, shaded green, of the overall area of the graph. The first step to ensure this graph is clean and accurate is to ensure a CDN for Magento has been implemented. Whilst beyond the scope of this article, three key considerations for a CDN should be factored in when deploying it to make the most effective use of it,
- Set the TTL to at least 30 days
- Never clear/flush/refresh the CDN cache
- Browser cache-busting techniques should be used (see static signing for Magento 2 and Gordon Knoppe's module for Magento 1)
Diagnosing why Varnish has no cache hits
So if you have properly enabled Varnish for Magento 2 - but still aren't seeing cache hits, there's likely one cause, your store itself. Thankfully, finding what is at fault is fairly easy.Open vendor/magento/framework/View/Layout.php and modify the isCacheable() method like so,
    public function isCacheable()
    {
        $this->build();
        $cacheableXml = !(bool)count($this->getXml()->xpath('//' . Element::TYPE_BLOCK . '[@cacheable="false"]'));
+       if (!$cacheableXml) {
+           var_dump($this->getXml()->xpath('//' . Element::TYPE_BLOCK . '[@cacheable="false"]'));
+           exit;
+       }
        return $this->cacheable && $cacheableXml;
    }
If you're using Magento 2.3+ the syntax of this file is slightly different - in this case, add the following instead:
    public function isCacheable()
    {
        $this->build();
        $elements = $this->getXml()->xpath('//' . Element::TYPE_BLOCK . '[@cacheable="false"]');
        $cacheable = $this->cacheable;
        foreach ($elements as $element) {
            $blockName = $element->getBlockName();
            if ($blockName !== false && $this->structure->hasElement($blockName)) {
+               var_dump($this->getXml()->xpath('//' . Element::TYPE_BLOCK . '[@cacheable="false"]'));
+               exit;
                $cacheable = false;
                break;
            }
        }

        return $cacheable;
    }
Then, just load the page in a web browser and you'll see a dump of the XML block responsible for marking the page as non-cachable.
Identifying the block is easy, fixing it, well, that's a task for your developers!